How to create shadow-box generator using HTML, CSS & JavaScript.
Posted on 2024-09-06

Hello guys👋! Today we are going to learn how to create shadow-box generator using HTML & CSS. What will you gain after following this tutorial? I hope you will understand and improve our styling skills using CSS and increasing our logic using JavaScript.
read also How to create simple animation using HTML & CSS.
Firstly, we need to create a folder. You can name it "Box-shadow generator." or anything you prefer. Then, we will create HTML, CSS and Javascript files within that folder. Name the HTML file "index.html", CSS file "style.css" and the JavaScript file "script.js".
In the HTML file, we will set the title within the
tags. Name the title "Box-shadow generator.". In the 'body' element, we will add a 'div' element with a 'div' inside it, and assign the class "main" to the 'div'.Here the html code.
    <!DOCTYPE html>
<html lang="en">
<head>
   <meta charset="UTF-8">
   <meta name="viewport" content="width=device-width, initial-scale=1.0">
   <link rel="stylesheet" href="style.css" />
   <title>shadowbox-generator</title>
</head>
<body>

       <div class="main">
           <h1>Box-shadow generator.</h1>
           <div class="form-group">
               <label for="offset-x">Offset X:</label>
               <input type="range" id="offset-x" name="offset-x" min="-50" max="50">

               <label for="offset-y">Offset Y:</label>
               <input type="range" id="offset-y" name="offset-y" min="-50" max="50">

               <label for="blur-radius">Blur Radius:</label>
               <input type="range" id="blur-radius" name="blur-radius" min="0" max="50">

               <label for="spread-radius">Spread Radius:</label>
               <input type="range" id="spread-radius" name="spread-radius" min="0" max="50">

               <label for="border-radius">Border Radius:</label>
               <input type="range" id="border-radius" name="border-radius" min="0" max="100" value="0">

               <label for="color">Shadow Color:</label>
               <input type="color" id="color" name="color">
           </div>


           <div id="preview-box" class="preview-box"></div>

           <div class="copy">
               <input id="css-code" class="textarea" readonly>

               <button id="copy-btn" class="btn">Copy</button>
           </div>


         </div>


     <script src="script.js"></script>
</body>
</html>
Then, we need to style and add animations using CSS. Firstly, we will set the padding and margin to 0 for the entire page. Next, we will apply styles to the
element and style the .main class.CSS code
/* Resetting and base styles */
* {
  margin: 0;
  padding: 0;
  box-sizing: border-box;
  font-family: 'system-ui', '-apple-system', 'BlinkMacSystemFont', 'Segoe UI', 'Roboto', 'Oxygen', 'Ubuntu', 'Cantarell', 'Fira Sans', 'Droid Sans', 'Helvetica Neue', 'sans-serif';
}

body {
  min-height: 100vh;
  display: flex;

/* Center horizontally */
  justify-content: center;

/* Center vertically */
  align-items: center;
  background-image: linear-gradient(to bottom, #1488cc, #2b32b2);

/* Prevent content from touching screen edges */
  padding: 20px;
}

h1 {
  text-align: center;
  font-weight: bold;
  margin: auto;
  margin: 5px;
}

.btn {
  background-color: #0270c6;
  padding: .5em;
  box-shadow: 5px 4px 6px 0px #000000;
  border-radius: 13px;
  color: #fff;

}

.btn:hover {
  background-color: #1292f3;
  box-shadow: 1px 1px 6px 0px #000000;border-radius: 13px;
}

.main {
  box-shadow: 0px 0px 5px 0px #0a68ff;border-radius: 0px;
  width: 50%;
  background-color: #fff;
  padding: 20px;

  transition: all 0.3s ease;
}

label {
  background-color: #fff;

/* Add space between label and next element */
  margin-bottom: 10px;

  font-size: large;
}

/* Container for label and input */
.form-group {
  display: flex;
  flex-direction: column;

/* Space between each form group */
  margin-bottom: 20px;
}

.form-group label {
/* Space between label and input */
  margin-bottom: 5px;
}

.preview-box {
  padding: 10px;
  background-image: linear-gradient(to bottom, #1488cc, #2b32b2);
  border-radius: 8px;
  border: 1px solid #ccc;
  transition: all 0.3s ease;
}

.textarea {
  width: 55%;
  padding: .5em;
  margin: 0;
  margin-left: 0;
  display: flex;
  justify-content: center;
  align-items: center;
  box-shadow: 5px 4px 6px 0px #000000;border-radius: 13px;
}

.copy {
  display: flex;
  justify-items: center;
  align-items: center;
  justify-content: center;
  justify-content: space-between;
  margin-top: 10%;
}

/* Preview box specific styles */
.preview-box {
  height: 80px;
  margin: 20px auto;
  border: 1px solid black;
  width: 50%;
}

/* Responsive adjustments for smaller screens */
@media (max-width: 768px) {
  .main {
  /* Reduce width on tablets */
    width: 80%;
    padding: 15px;
  }

  .preview-box {
  /* Adjust to full width on smaller screens */
    width: 50%;
    margin-bottom: 15px;
  }

  .textarea {
    width: 55%;
    font-size: x-small;
  }

  .form-group {
  /* Ensure label and input are stacked vertically */
    flex-direction: column;
  }
}

/* Extra small screens (mobile phones) */
@media (max-width: 480px) {
  .main {
  /* setting width on small screens */
    width: 90%;
    padding: 10px;
  }

   .preview-box {
  /* setting width for inputs on mobile */
    width: 50%;
    margin-bottom: 10px;
  }

  .textarea {
    width: 55%;
    font-size: x-small;
  }

 /* Reduce spacing between form groups */
  .form-group {
    margin-bottom: 10px;
  }
}
Finally, we add the JavaScript logic to manage or set the box-shadow, just like you. The JavaScript code is shown below.
const offsetX = document.getElementById('offset-x');
const offsetY = document.getElementById('offset-y');
const blurRadius = document.getElementById('blur-radius');
const spreadRadius = document.getElementById('spread-radius');
const color = document.getElementById('color');
const borderRadiusInput = document.getElementById('border-radius');
const previewBox = document.getElementById('preview-box');
const cssCode = document.getElementById('css-code');
const copyBtn = document.getElementById('copy-btn');
const btnCopied = document.querySelector('button');

function updateShadow() {
    const offsetXValue = offsetX.value;
    const offsetYValue = offsetY.value;
    const blurRadiusValue = blurRadius.value;
    const spreadRadiusValue = spreadRadius.value;
    const colorValue = color.value;
    const borderRadiusValue = borderRadiusInput.value;

    const boxShadow = `${offsetXValue}px ${offsetYValue}px ${blurRadiusValue}px ${spreadRadiusValue}px ${colorValue}`;
    previewBox.style.boxShadow = boxShadow;
    previewBox.style.borderRadius = `${borderRadiusValue}px`;

    cssCode.value = `box-shadow: ${boxShadow};\nborder-radius: ${borderRadiusValue}px;`;
}
offsetX.addEventListener('input', updateShadow);
offsetY.addEventListener('input', updateShadow);
blurRadius.addEventListener('input', updateShadow);
spreadRadius.addEventListener('input', updateShadow);
color.addEventListener('input', updateShadow);
borderRadiusInput.addEventListener('input', updateShadow);

// Add event listener to copy button
copyBtn.addEventListener('click', function() {
    // Copy the CSS code to clipboard
    navigator.clipboard.writeText(cssCode.value)
      .then(() => {
        // Show confirmation message

        btnCopied.textContent = 'Copied!'
        // Hide confirmation message after 2 seconds
        setTimeout(() => {
          btnCopied.textContent ='Copy'
        }, 2000);
      })
      .catch(err => {
        console.error('Failed to copy: ', err);
      });
});


updateShadow();
Then, you can run your code from the terminal.
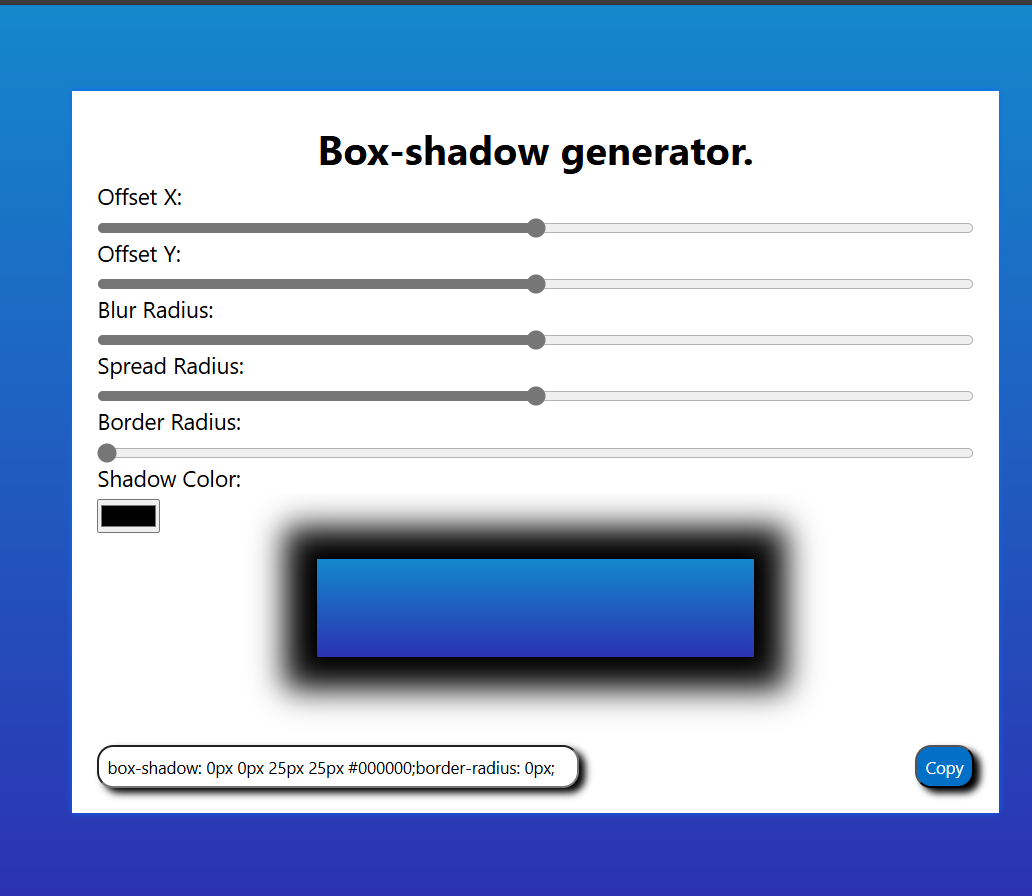
The result will look like this

Thank you for reading! If you found this post helpful, please spread the word.
We'd love to hear from you! Let us know how we can better assist you by sharing your suggestions.
Contact us:
https://muhamadalzika.com/about
Email:
.jpg&w=256&q=75)